Best Practices for High-Quality Travel Photos With an iPhone
How can you go on a trip once and yet experience it twice?
Easy: once in the present moment, and again while looking through photos.
While being present during any trip is the most important aspect of living in the moment it’s also important to capture the experience on camera.
High-quality, thoughtful photos can capture the highlights (and even small details) of your trip to constantly be reminded of the beauty of the places, people, culture, landscapes and architecture of your travel experiences. Although traditional cameras offer the best-quality photos, it’s not always practical to carry around a bulky camera that requires time to set up the best shot when you’re busy trying to live in the moment.
Enter the iPhone: a convenient, light-weight device with a built-in camera that you’ll already be taking with you everywhere on your trip anyway.
Here’s how you can capture high-quality photos on your next trip using only your iPhone, the right set up and a few additional assets.


Before the Trip: Prepping Your iPhone
Before you hop on a plane to your destination, there are a few steps you can take to ensure your iPhone is ready for the impending influx of photos.
First, make plenty of room for travel photos on your iPhone by deleting some or moving them to Google Photos or other storage space.
Avoid wasting time on changing settings in the moment by prepping them beforehand.
In the settings of your iPhone, turn on HDR to balance the brightness of your photos. HDR captures the bright and dark parts of any scene and combines them to balance the exposure.
Also turn on your grid lines to follow the rule of thirds: break each image into thirds horizontally and vertically while keeping your subject at the intersections or along the lines.
Finally, turn on Live photo so you can choose the best frame of any photo or turn it into a long exposure, short video / gif, or boomerang.
To really enhance your iPhone’s capabilities and photo quality, consider investing in a few additional accessories to pack in your suitcase:
Portable chargers, like this one from Anker PowerCore, are perfect for travel as taking pictures drains iPhone battery quickly (whenever possible, switch on airplane mode to save battery life)
External lenses and a tripod can take your photo game to the next level. Try the Pixter upgraded Travel Pack with Wide Pro 2 lens and flexible tripod
Waterproof cases, like the JOTO Waterproof pouch from Amazon lets you take amazing underwater photos
Wrist straps give you easy access to your phone at all times. Try the Moment leather phone wrist strap
Clip on lights help in poor lighting conditions, like this Auxiwa clip on selfie ring light from Amazon

The Pixter tripod can be shaped to grip almost anything
During the Trip: Taking Photos
It’s all about the angles —
When taking a photo, always have a focal point whether it’s a building, light bulb, person, food item, etc. Use a person as the focal point when there’s no clear subject or the landscapes appear “flat”.

Adding a person as the subject gives this flat photo a focal point
Capture details and close-ups along with traditional wide shots for a variety of perspectives and angles. You can also try shooting from a low angle to show a scene from a different perspective and capture at least 1 photo from a high vantage point for a high-level (literally) overview of your travel. You can also try using panoramas for a wide shot and look for pops of color or contrasting colors.

Take photos from a low angle for a different perspective
To capture architecture, look for symmetry or repetition in details or patterns and use vertical panorama for tall buildings.
Don’t zoom in with your phone camera but actually get up close to avoid grainy photos.
Catch the light juuust right —
“Golden hour” is literally gold for photography. Because there are not many flash settings on phones, do your research beforehand to find out what your destination’s “golden hour” is. Typically, it is after the sun has set behind the horizon which creates soft lighting conditions.

The sun set behind the horizon gives this photo a “golden” hue
Use the flash sparingly, specifically when outdoors and the sun is creating harsh shadows. If possible, only use natural light or an alternative light source like a flashlight.
Speaking of natural light, use it as much as possible. Cloudy days and shadows create soft light, which is ideal for photos. Harsh light is found in the middle of a sunny day and can create hard lines and shadows.
To adjust the natural light exposure on your phone, tap your screen to focus the camera or tap and hold to lock the focus point and move the yellow “sun” icon up or down the slider to adjust the lighting in the moment.
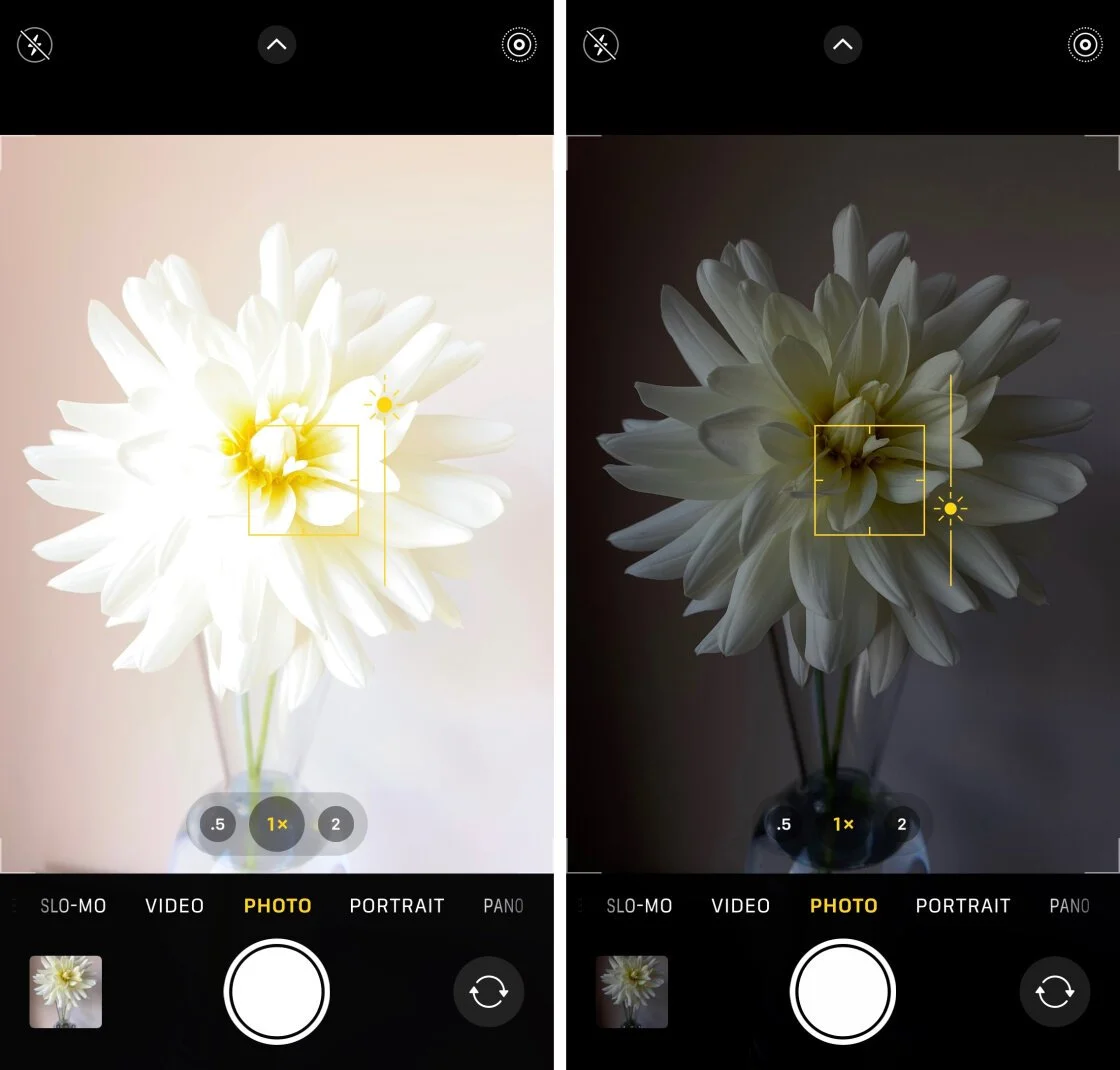
Slide the exposure icon up and down to adjust brightness
Adjust your settings —
Be sure to clean your iPhone’s camera lens frequently with a cloth or even a t-shirt.
Because movements are very fast and the perfect shot is hard to capture, use burst mode (hold down the shutter button) so you have every moment of the action.
Try learning how to shoot in manual mode using apps like Halide so you can capture more detail and less noise.
Take advantage of the iPhone’s photo modes like portrait, panorama and square (especially if posting on social media). For portrait mode, set the f stop before you take a photo to decide how much to blur the background. A smaller f is a greater background blur and larger f is less background blur.
After the Trip: Editing With iPhone
Your iPhone doesn’t quit after the photos have been taken, quick editing can be done right from your phone as well to enhance your experience.
Less is more when it comes to filters – just try to enhance the natural beauty of the photo without overdoing it.
An easy fix is to straighten your photos after the fact to ensure a straight horizon.
Use the guidance of editing apps, like Lightroom, and consider investing in Presets to cut down on time to manually edit your photos and create consistency.
Select the best frame from your live photos.
Edit the different elements of your photo using iPhone’s built-in editing capabilities: exposure, contrast for depth and illuminating details, crop for drawing the eye into the image and removing distractions; saturation for enhancing colors, and highlights to avoid overexposure or overly dim photos.

Use iPhone’s pre-existing filters & editing capabilities to enhance your photos
With your iPhone’s camera, a few accessories and settings, and a post-trip editing session, you can live in the moment on your trip and still capture breath-taking photos.